Custom Handrails

HOME RENOVATION
In addition to putting in hardwood stairs, I also wanted to replace the "baby crib" style vertical stair rails with metal horizontal rails.
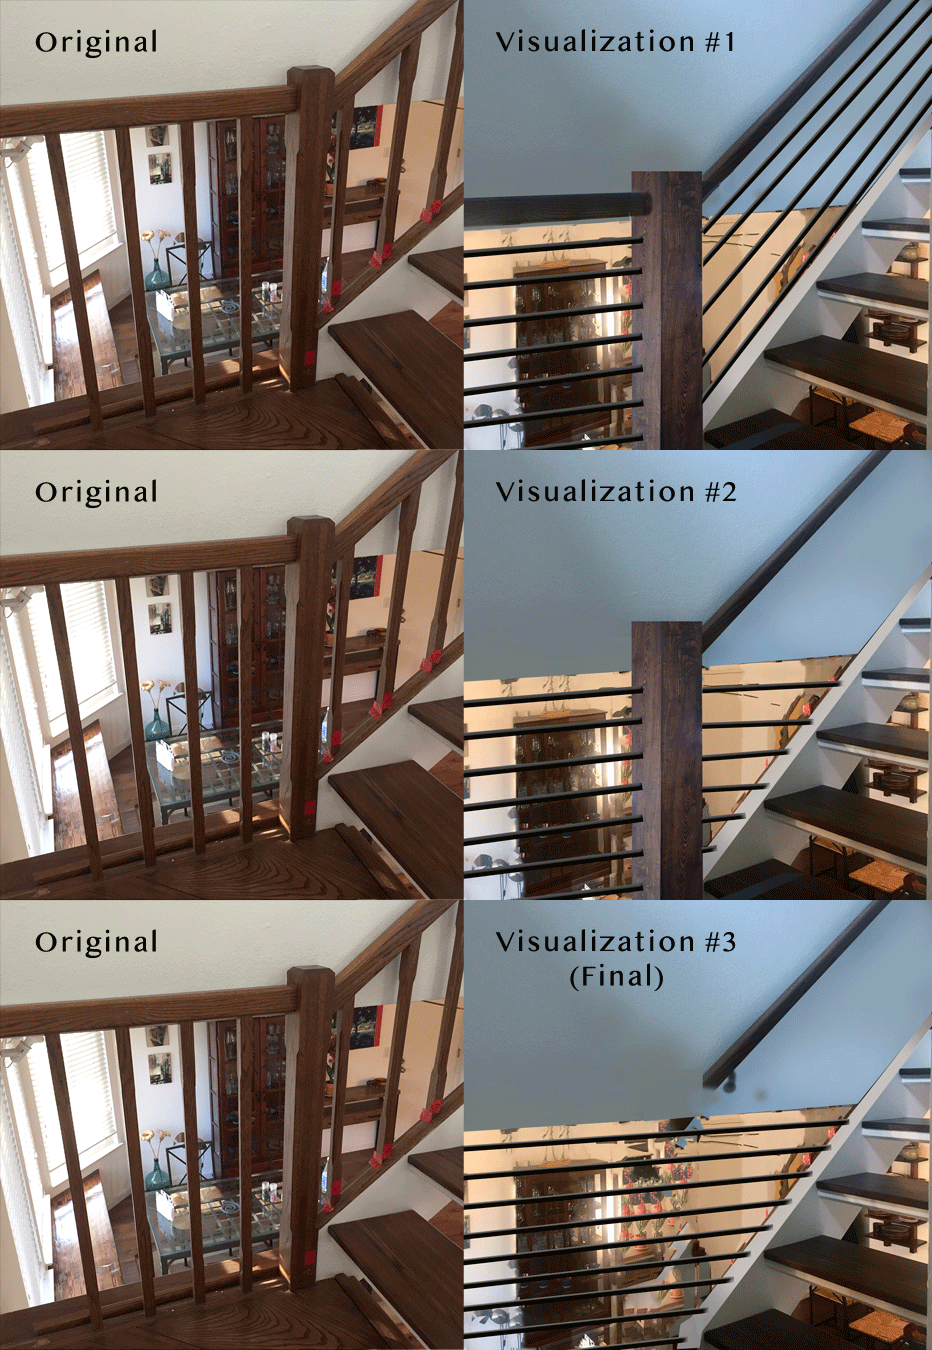
The first step here was pre-visualization. I made several versions of rails, which you can see here in Photoshop, to work out both aesthetics and feasibility. After much consideration I arrived at version "D".

One area in particular that needed to be developed was the "window" where you can look from the stairs into the dining room. At first I had planned on simply replacing the vertical rails with horizontal ones, as shown in visualization #1 below. However, trying out design options, I decided that visualization #3 looked much more elegant, and made more practical sense with the space since one does not need a hand rail on the landing, and instead needs guard rails in the window.

Here you can see the original, the visualization, and the finished renovation. In addition to putting horizontal bars into the "window" area, I also converted the existing handrail to a wall mounted handrail. I love coming up with a design that feels like it goes with the space architecturally. The original rails here, in contrast, feel very out of place.

The first challenge in all of this were the metal bars. After being disappointed by what was available at big box stores, I went to a metal supply shop and found these square steel bars, which come in lengths of 20 feet. I calculated out the exact lengths I would need, determined I could have them all cut in half to 10 foot lengths which would fit in my garage, and had them delivered by truck. I chose hot rolled steel over aluminum because of the rounded edges. Hot rolled was the most economical steel, and looked awesome. Once I figured out the exact lengths I needed for each section, I cut all the steel bars myself with my new metal chop saw outside our garage, while Julia stood by with the garden hose in case of flying sparks!

The next challenge was painting the bars, which is particularly difficult with metal. After some experimentation with metal paints and primers I ended up using a product from Sculpt Nouveau called "Smart Stain" which is a black oxide with a polymer/ resin binder. I then sealed it with their wax, giving it a nice buffed semi-gloss sheen.

To attach the bars I found this star insert that is normally used to attach a wheel to a metal chair leg. It snaps into the end of a metal tube (pictured here), giving you an opening for a 1/4 in metal screw. I could then screw each bar into the pre-drilled holes on the metal flat pictured here, and attach that into an indent I had cut into the wall, finally covering it with drywall plaster, making the connection rock solid, yet invisible.


To attach the bars to the wood newels I simply drilled a hole into the hollow newel and put the screw in from the inside, attaching it to the star-insert in the bar. The trick here was assembling the newels in parts around the existing newels. You can see for instance in the newel at the top of the stairs is missing the top and one side. I later attached that side with the bars in place and then sealed, sanded, stained, poly-ed, and waxed the newel facades in place to make the seams invisible. Sanding anything in the center of your house is a great ordeal, so I covered myself with plastic tarp as a makeshift tent and sanded underneath it. Yes, I was wearing a chemical-grade dust mask, but definitely needed a shower afterwards!


Below you can see several before/after pics showing the transformation, both from "cat-lady" carpeted stairs to hardwood stairs, and from baby-crib balusters to horizontal metal bars with rustic wood newels for that modern farmhouse look.

Before

After
As you can maybe see in the "before" image above, for some reason unbeknownst to me, the original handrails on the bottom flight of stairs were placed too low. So you had to bend over to reach them. In addition to not being very safe, it also looked bad. So I raised them to the proper height. Below are some more before/after pics...


Here's a shot of me adding the final touches, such as covering the embedded metal flat with drywall tape to prepare it for plastering and painting. I also replaced the wood trim on the bottom, added pieces of hardwood floor in a few places that did not have any before, and fixed baseboards near walls.
